Friday, 17 February 2017

Skills Development - Product Design


Within this project we were tasked to choose a specialism we wanted to improve. As I wanted to improve my concept art I choose product design, where we were told to simply design a product sheet, this could be anything from an in game prop to a vehicle etc. When I began designing my project for product design I saw this as a good opportunity to go back to what I used to do, which was designing weapons for game. While although I didn’t want to do something as simple as a sword or staff, with my new experiences and influences I new I could design something for in game that I would be proud of.

After playing games such as Bloodborne and enjoying the design of the trick weapons and the mechanical theory behind such weapons I knew I wanted to have some form of transforming element to my design. At the time I was also watching the Rooster Teeth animation RWBY, which had a similar concept of weapons with multiple functionalities. I took these influences and looked into weaponry that I thought could mesh well together.


I decided to use a Tonfa as the main body of the design, however with it being a much more larger and exaggerated piece. Although there is some level of fantasy to the piece, I wanted to involve some form of science into the piece to make it somewhat believable. This would later become the suspension in the front of the weapon as well as the exhaust on the back.

Because I wanted the weapon to be able to transform I needed to find another kind of weapon to use. Since the Tonfa is a close quarters combat type of weapon I made it that the weapons handle could extend and turn into a giant hammer. Since the weapon has thrusters I felt this would work well with how the hammer works as well.


Because I had difficulty with perspective I began my making a 3D model on Maya to help me with the proportions of the piece. This didn’t take very long as this was mainly to get the basic outline to take into Photoshop and apply a 3D paint over. Once the mesh was made a screenshot and opened it up in Photoshop. I had made mood boards and reference images to get realistic colours for the piece. When I started however I found the colours to be flat and had no life to them. I wasn’t able to portray what materials the weapon was made out of so I started again.


This time after talking with my lecturer, who explained how light works on metal such as having strip lights making bands of light on a shiny surface, I began painting my model. Using the layer function to more of an effect, I made a layer for each part of the model, slowly building up the materials. I found this method worked extremely well especially when playing close attention to what lighting I was using. While in hindsight I wouldn’t have liked to make the piece look even more realistic, at the same time I’m happy with the end result of how the colours worked.


Once the first one was completed I now had the process to create paint overs at any angle I wanted. Using this process I saved a lot of time and was able to implement this into other actions of the weapon. For example, to demonstrate the weapons transforming function, I could keep the camera in the same place in Maya and move each piece of the model into new positions; this would eventually after having the paint over, keep the angle, geometry and colours the same, while at the same time showing how everything worked in the final piece.
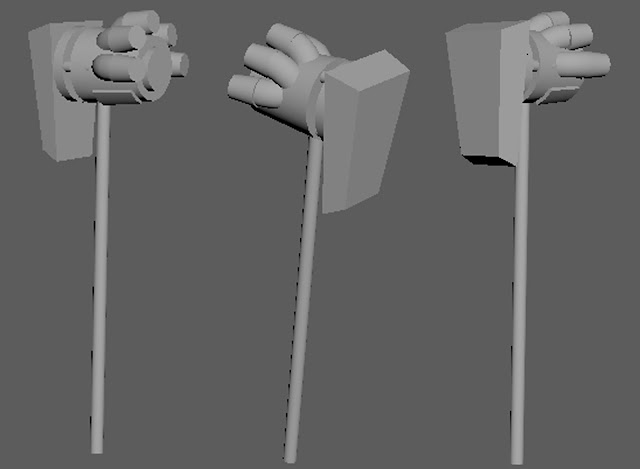


Finally once the Hammer perspective pieces where done I designed to add more to the piece by thinking about its utility within a game. Although I didn’t know whether the player or an NPC would use the weapon, I wanted to think of the practicality of the piece. I had already decided that the weapon would be steam powered, using compress steam to propelled attacks and the player forward, its transforming mechanic and implementing a fly wheel the player could see when the weapon is charging up to create more steam; but then I thought of how it would be used to fight with. I decided to add a ranged attack function to the piece, thus giving the weapon more functionality as well as practicality.

I once again went to Maya and made a 3D model of what I thought the fuel/ammo for the weapon would look like. I made it so the weapon could take water (to create its main force of steam), poison and petrol to create 3 different form of attack. Once the paint overs where finished I created simple sheets of what each would do. I wanted to make each of the different ammunition unique to the others.


For the condensed water, I thought it would be useful if the wielder was able to make smoke screens from all the steam, as well as using the steam to propel the weapon forward (in whichever mode it was in). As these abilities were quite passive and still didn’t give it any range, I decided the petrol would be able to create large fireballs the weapon could fire, as well as making use of the multiple exhaust pipes, being able to fire a rapid succession of smaller blasts. Finally, with the poison ammunition, I decided it so the weapon could fire a similarly to the flamethrower, however this time the weapon could control the gas it had released. I also thought it would be interesting if the wielder could lay down puddles of poison to act as mines.


I decided on each of these as they each introduced new ways the weapon could be used, as I wanted the main theme of this weapon to be adaptability, whether it regarded in close to mid range combat, or utilising each of the ammo spheres to increase variety.


I’m thoroughly pleased with this project as I had the freedom to try out different ideas as well as go back to one of the fundamental things I enjoyed about games, which is weaponry. I was able to fictional mechanics and enjoyed imagining how the weapon would be used.


Bibliography:

Tonfa:


Hammer


Mechanics


Materials


Tuesday, 22 November 2016

Moiving_Door


To begin this project we opened up UE4 to get the right dimensions of our characters. We used boxes, spheres and other shapes to get the rough approximations for our character to be able to walk through. From there we began building very rough versions of our doors, using the frame as a centrepiece and building around it. While some went for much grander designs with a much larger for the character to walk through, I kept mine rather simplistic and focused more on the mechanics of the door.

As with this project the door needed to have 3 moving parts which could be anything from the handle turning to the door itself opening (or its opening mechanism). As another project going on at the time of this one was to create a game prototype, I decided to use my theming from there and make a door that could used within the prototype as well.

First Rough Design (With moving Animation)

Second Rough Design (With Animation)

Third Rough Design

As the setting of the other project was to be within an abandoned Asylum, I made my door look like a heavy-duty locked door. Even though this is still only within UE4, I was able to have a rough idea of what the door would look like, or rather the mechanics it would use to open. The door itself would have 4 bars that come down vertically, into a brace that (once the bars were removed) would slide across horizontally. I liked this design as looking at it made me think this was a solid door, and there would be no way to get through it without its key (the main focus of what I wanted my door to do).

Animation Sheet


From there I exported the rough design into Maya, lowered the transparency and began to start building the rough shape of the door within the originals silhouette. I had some trouble early on as although I knew what the door would look like in my mind, making it real within Maya was much more work. I created mood boards of different kinds of doors aesthetics as well as real world mechanics to help me become inspired to design the door.

Exported Mesh from UE4 (Made transparent to be able to build upon)
Mood Board

Once I had the rough outline created and looked at enough reference material I began working on specific parts of the door, for starters being its hinge. Originally I wanted to add hinges similar to that of a vault, being extremely large and heavy, however looking at the overall design I felt these would be to out of place, as well once animated, I didn’t want to stretch the polygons or have any defects.

Hinge Design 1 (Stretching Polygons)


I was then able to create my hinges and fix them onto the door, spacing them out evenly enough to ensure nothing was going to be able to get through. I looked at different kinds of hinges and found one that I liked, and from there I tried to recreated them in Maya. Once they were created, I fixed them onto the door, separating so the hinges could act like a pivot. 

Re-Designed Hinge (With Movement)


Door with Hinges

Once i had spaced them out fully I needed to create the frame for them to be attached to. I wanted to keep the form of the frame simplistic while still portraying a menacing appearance. I didn't want to make the frame to complex and take the attention away from the door, so rather then using a normal frame to go around the entire door, I made the doorframe look like two panels, with bars going in-between. Although this was different to my original design, I felt this gave the door to have slightly more depth then simply being a door within a frame.

Door with Frame


As with Maya and UE4, I didn’t want to waste any geometry and tried to use more advance modelling techniques rather then simple block shapes. With some help I was able to create the brace to have as much detail in a very simple way, of creating the holes for the bars to slot into, and building out from there, essentially building a 3-dimensional object by starting it on a 2-dimensional plane. A lot of my ideas came from my mood board and my overall idea when thinking of a containment door. I thought of where this door would be, who would be locked away and what kind of environment the door would be around. Since the door would have been inside an abandoned Asylum I knew most of my doors detail would come from its textures, however that didn’t mean I could be lazy in what id create. In hindsight I could have added some more detail to the top bars, possible adding slots the bars could have gone into or other aesthetically pleasing design choices, however as I can only think about this after the door has been finished, naturally there will always be more I could have added.

Making Process of Brace (2D into 3D)

Once this was all complete, As I had been adding edge loops to each thing that I made for the door to save time for later, i essentially had my high poly model created. All i had to do at this stage was to use the smooth tool within Maya to amplify the number of vertices, edges and faces of each mesh to give them a smoothed edge look.

Finished High-Poly Door (Not yet smoothed)

Smooth High-Poly Mesh


Once the high poly was created. I duplicated the original mesh again and began deleting edges and vertices of my model to create my low poly. One thing I needed to make sure of was to not to delete certain edges or vertices that would lose the overall silhouette from the high-poly, as this would cause a poor bake later one. With the brace for example, as the player wasn’t going to be able to see underneath it, I decided to use a flat cuboid and bake the information of the high-poly on top of it. Although this seemed like a good idea at the time once baked the quality didn’t look very good and in hindsight I should have designed it better, with possibly hole going all the way through the mesh. With parts like the frames, rather then having the edge go all way around and waste geometry; using the Target Weld tool within the program, i was able to pull the to the highest and lowest vertices, reducing the tri and poly count.

Low-Poly Mesh


Difference in High/Low-Poly Meshes

Once all the unnecessary edges and vertices were deleted, I opened up the UV editor to begin separating the UV islands and making my UV map for baking. To do this I did an automatic unwrap on the entire mesh and then began selecting faces that would fit together as a flat surface (such as the walls to the left and right of the door).

Initial Auto UV Unwrap


The process takes some time however learning from the last time I did UV mapping (being the time machine project), I had learnt much more from then, such as how to properly unwrap cylindrical objects and how to make the most out of the UV space. Before I left a lot of room within the UV space and wasted some of it keeping UV islands that could have been separated, together. Although there is much more I have to learn within UV mapping, from learning from old mistakes I can comfortably say I am much more proud of the overall bake of my model then last time.

Finished UV Map

Once the UV map had been made, I arranged all the pieces on top of each other and duplicated the low poly. I increased its transparency and enlarged it using the transform function within Maya. By making this transparent and a different colour, when enlarging it I was able to see which part of the low/high poly model was sticking through, as when creating a Cage, it cant be made to large as it needs to capture all the information. As the door didn’t have any outrageous edges or sides, creating the cage was fairly simple.

Now I had my high/low poly model as well as my cage, I needed to explode my mesh to bake so I could bake each separate piece; doing this increase the chances of a higher quality bake. To do this all I had to do was select each of the pieces as a group, for example the bars as one group, the doorframe as another group and the brace as another group. I moved each of these into a exploded version of my mesh in a straight line of one another, with the low poly, high poly and the cage all sitting together within separate layers.

Exploded Mesh (Front and Back)


Once all the pieces where sitting together in their own respective layers, I selected each of the low-poly meshes and exported them; then going on to do the same with the high-poly and the cage, and once exported I opened Substance Painter to bake the model. Although normally I would have used XNormal for my bakes, since we were using Substance Painter to texture our models as well, we were shown how to do it a different way for this project.

I loaded in my low-poly mesh and went to bake the model, importing my high-poly model as well as the cage. I chose the maps I wanted (that being Normal, World, Ambient Occlusion and…) and then bakes the model to project the high-poly models details onto the low-poly model. Even though the model was still exploded, since all the UV’s were the same, once I had all the details within the texture maps, I was able to save the maps back onto my computer and then move back into Maya to put the exploded model back together.


Exploded Mesh in Substance Painter (Low and Baked Versions)


Now back together, all I had to do was export the recombined low-poly model back into Substance Painter and the baked maps I had just created as well, and load them onto the low-poly model. This process created a much cleaner bake and although possibly taking more time rather then baking the entire mesh, this process can be used for much more complex bakes on later projects.

Mesh assembled and first layer of materials 

Now I had my re-established model within Substance Painter, it was time to start adding the textures. As I had used Substance Painter before (although with a lot of help) I roughly remembered the basics of how to apply textures and different effects. While possibly quite simplistic the effect worked most well by having layers on top of each other with black masks, which would place the material/texture all over the model, and then using different brushes and alphas, I was able to reveal these textures on particular parts of the mesh. This process let me add layers of depth and wear to my model.

Another feature I found within Substance Painter is the use of generators, in which a level of grunge and spaced out versions of a certain texture would be places all over the model, combining this with a black mask allowed me to reveal more realistic grime effects without having to create them all by hand, which was a very useful process.

Another feature that I found useful was combining materials in different degrees. the walls around the door are made with different kinds of concrete, which by using different brushes and alphas (the shape of the brushes) I was able to make the walls look more run down in certain areas.

Development of Mesh Materials using Masks


Substance Painter’s most useful feature however is its rich library of materials. These are pre-existing textures within the programme that can be used to create shocking realistic effects on my model; with the smart materials doing an even better job for certain parts of the model, these are especially useful as not only is the material detailed, but specifics within the material can be changed, such as dirt, scratched and other details. One of these being the machinery material that I used for my hinges and braces, with its recognisable yellow working within that context. Initially I changed the colour to a darker green however the was to dark in contrast to the rest of the mesh, so I made it into a brighter yellow before adding more damage and detail.

Initial Use of Smart Materials, redone and Developed


However Substance Painter doesn’t accommodate all kinds of materials, and some can be made within the program itself; such as the leaking oil and grime over the metal work on the model. To do this I took a pre-existing material of rubber and used a black mask to make it invisible over the entire model. Then by experimenting with its roughness and metallic values within the program, I was able to make it slightly shinier and take away some its matt qualities to make a more oil looking material.


At first I tried simply painting the material onto the model, however the look seemed too artificial and not organic enough. I looked at the particle effects within Substance Painter and by testing and experimenting with them I found I could make it look like dripping oil. All I had to do was find certain spots that the oil may have leaked out of and use the particle tool to ‘spray’ on the material (as since the particles worked similar to real life, such as a dripping effect like water) the look seemed more genuine and realistic, rather then being able to see obvious brush strokes across the model.

Use of Damage and Finished Texture

Now all the textures were complete, I exported the texturing into UE4 to not only see how they work real time but to also see the door moving in game. When exporting the textures I exported my Albedo, Normal and a new type of export I had learned called an RMA map. This is where my Roughness, Metallic and Ambient Occlusion maps are combined into a single map to save memory space. I did this more to see if it would work and luckily i found it was fairly simple to use. I opened up a new project and imported the door and the textures. As i was used to I plugged my Abledo and Normal maps into their respective nodes. When it came to the RMA map, on the texture nodes within UE4 there was the alpha and then also a red, green and blue nodes. I used each different colour to link to each respective node(Red for Roughness, Green for Metallic and Blue for Ambient Occlusion). As I had already used this model in another project, I was able to simply copy the vectors for each piece of the door and checked to see if everything was functional. From there I created a new material and and plugged each of the textures from Substance Painter into the correct nodes in the Materials graph.


Opening Animation Sequence 


Albedo


RMA


Normal


It was very interesting to see something I had made and textured all on my own appear in UE4; seeing it move and look like a real part of a game. While there may have been things I could have worked on I am especially happy with the final result. Although I have created models and textured them before, I've never also have them be able to move within UE4. This project has taught me a lot about texturing, modelling and specifically modelling something with the mind set of it actually working (with the bars and locks). I look forward to creating more models like this in the future and am proud I was able to develop another skill to use in my studies.


Bibliography: