Within this project we were tasked to choose a specialism we
wanted to improve. As I wanted to improve my concept art I choose product
design, where we were told to simply design a product sheet, this could be
anything from an in game prop to a vehicle etc. When I began designing my
project for product design I saw this as a good opportunity to go back to what
I used to do, which was designing weapons for game. While although I didn’t
want to do something as simple as a sword or staff, with my new experiences and
influences I new I could design something for in game that I would be proud of.
After playing games such as Bloodborne and enjoying the
design of the trick weapons and the mechanical theory behind such weapons I
knew I wanted to have some form of transforming element to my design. At the
time I was also watching the Rooster Teeth animation RWBY, which had a similar
concept of weapons with multiple functionalities. I took these influences and
looked into weaponry that I thought could mesh well together.


I decided to use a Tonfa as the main body of the design,
however with it being a much more larger and exaggerated piece. Although there
is some level of fantasy to the piece, I wanted to involve some form of science
into the piece to make it somewhat believable. This would later become the
suspension in the front of the weapon as well as the exhaust on the back.
Because I wanted the weapon to be able to transform I needed
to find another kind of weapon to use. Since the Tonfa is a close quarters
combat type of weapon I made it that the weapons handle could extend and turn
into a giant hammer. Since the weapon has thrusters I felt this would work well
with how the hammer works as well.


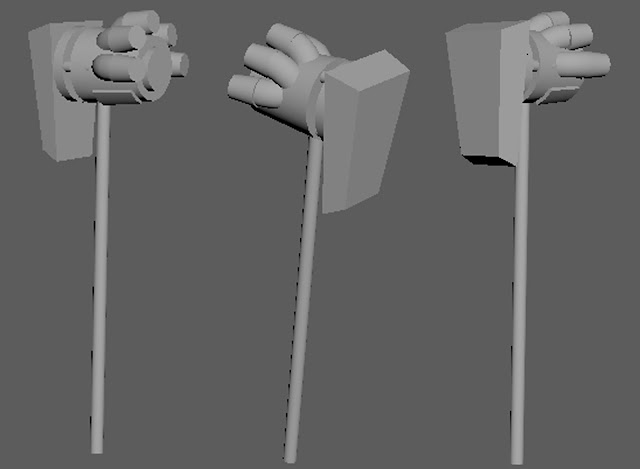
Because I had difficulty with perspective I began my making
a 3D model on Maya to help me with the proportions of the piece. This didn’t
take very long as this was mainly to get the basic outline to take into
Photoshop and apply a 3D paint over. Once the mesh was made a screenshot and
opened it up in Photoshop. I had made mood boards and reference images to get
realistic colours for the piece. When I started however I found the colours to
be flat and had no life to them. I wasn’t able to portray what materials the
weapon was made out of so I started again.

This time after talking with my lecturer, who explained how light works on metal such as having strip lights making bands of light on a shiny surface, I began painting my model. Using the layer function to more of an effect, I made a layer for each part of the model, slowly building up the materials. I found this method worked extremely well especially when playing close attention to what lighting I was using. While in hindsight I wouldn’t have liked to make the piece look even more realistic, at the same time I’m happy with the end result of how the colours worked.

This time after talking with my lecturer, who explained how light works on metal such as having strip lights making bands of light on a shiny surface, I began painting my model. Using the layer function to more of an effect, I made a layer for each part of the model, slowly building up the materials. I found this method worked extremely well especially when playing close attention to what lighting I was using. While in hindsight I wouldn’t have liked to make the piece look even more realistic, at the same time I’m happy with the end result of how the colours worked.

Once the first one was completed I now had the process to
create paint overs at any angle I wanted. Using this process I saved a lot of
time and was able to implement this into other actions of the weapon. For
example, to demonstrate the weapons transforming function, I could keep the
camera in the same place in Maya and move each piece of the model into new
positions; this would eventually after having the paint over, keep the angle,
geometry and colours the same, while at the same time showing how everything
worked in the final piece.


Finally once the Hammer perspective pieces where done I
designed to add more to the piece by thinking about its utility within a game.
Although I didn’t know whether the player or an NPC would use the weapon, I
wanted to think of the practicality of the piece. I had already decided that
the weapon would be steam powered, using compress steam to propelled attacks
and the player forward, its transforming mechanic and implementing a fly wheel
the player could see when the weapon is charging up to create more steam; but
then I thought of how it would be used to fight with. I decided to add a ranged
attack function to the piece, thus giving the weapon more functionality as well
as practicality.
I once again went to Maya and made a 3D model of what I
thought the fuel/ammo for the weapon would look like. I made it so the weapon
could take water (to create its main force of steam), poison and petrol to
create 3 different form of attack. Once the paint overs where finished I created
simple sheets of what each would do. I wanted to make each of the different
ammunition unique to the others.

For the condensed water, I thought it would be useful if the wielder was able to make smoke screens from all the steam, as well as using the steam to propel the weapon forward (in whichever mode it was in). As these abilities were quite passive and still didn’t give it any range, I decided the petrol would be able to create large fireballs the weapon could fire, as well as making use of the multiple exhaust pipes, being able to fire a rapid succession of smaller blasts. Finally, with the poison ammunition, I decided it so the weapon could fire a similarly to the flamethrower, however this time the weapon could control the gas it had released. I also thought it would be interesting if the wielder could lay down puddles of poison to act as mines.


For the condensed water, I thought it would be useful if the wielder was able to make smoke screens from all the steam, as well as using the steam to propel the weapon forward (in whichever mode it was in). As these abilities were quite passive and still didn’t give it any range, I decided the petrol would be able to create large fireballs the weapon could fire, as well as making use of the multiple exhaust pipes, being able to fire a rapid succession of smaller blasts. Finally, with the poison ammunition, I decided it so the weapon could fire a similarly to the flamethrower, however this time the weapon could control the gas it had released. I also thought it would be interesting if the wielder could lay down puddles of poison to act as mines.


I decided on each of these as they each introduced new ways
the weapon could be used, as I wanted the main theme of this weapon to be adaptability,
whether it regarded in close to mid range combat, or utilising each of the ammo
spheres to increase variety.

I’m thoroughly pleased with this project as I had the
freedom to try out different ideas as well as go back to one of the fundamental
things I enjoyed about games, which is weaponry. I was able to fictional
mechanics and enjoyed imagining how the weapon would be used.
Bibliography:
Bibliography:
Tonfa:
Hammer
Mechanics
Materials
No comments:
Post a Comment